Introduction
In this article, I will walk through the installation process, basic workflow, and advanced features of LightGBM.
Installation and Setup
Before installing LightGBM, ensure your system meets the following requirements:
- Python 3.6 or higher
- NumPy and SciPy
- scikit-learn (optional, for additional functionalities)
You can install LightGBM via pip:
$ pip install lightgbm
Basic LightGBM Workflow
We will explore the basic workflow of using LightGBM to train a model on a public dataset. We will use the Iris dataset, which is available through the scikit-learn library:
from sklearn import datasets
iris = datasets.load_iris()
X, y = iris.data, iris.target
Using scikit-learn, split the data into training and testing sets:
from sklearn.model_selection import train_test_split
X_train, X_test, y_train, y_test = train_test_split(X, y, test_size=0.2, random_state=42)
Creating LightGBM Dataset
We need to convert the training data into a LightGBM Dataset object. This object is specifically designed for use with LightGBM and allows for efficient handling of large datasets.
import lightgbm as lgb
train_data = lgb.Dataset(X_train, label=y_train)
Setting Model Parameters
Before training the model, we need to specify the model parameters. These parameters control various aspects of the model, such as the objective function, the number of classes, the type of boosting, and the learning rate.
params = {
    'objective': 'multiclass',
    'num_class': 3,
    'metric': 'multi_logloss',
    'boosting_type': 'gbdt',
    'learning_rate': 0.05,
}
Training the Model
We can now train the LightGBM model using the training data and the specified parameters. The num_boost_round parameter controls the number of boosting rounds, which affects the model's complexity and performance.
model = lgb.train(params, train_data, num_boost_round=100)
Evaluating Model Performance
Evaluate the model's performance on the test set:
from sklearn.metrics import accuracy_score
import numpy as np

y_pred = model.predict(X_test)
y_pred = [np.argmax(row) for row in y_pred]
accuracy = accuracy_score(y_test, y_pred)
print("Accuracy:", accuracy)
Accuracy: 1.0
Making Predictions
Make predictions using the trained model:
sample = X_test[0]
predicted_class = model.predict([sample])
print("Predicted class:", np.argmax(predicted_class))
Predicted class: 1
Exploring LightGBM's API
In this chapter, I will delve into the LightGBM API and explore some of its key functionalities. We will cover the LightGBM Classifier and Regressor, hyperparameter tuning, cross-validation, handling imbalanced data, and early stopping.
LightGBM Classifier
The LightGBM Classifier is an implementation of the GBDT algorithm for classification tasks. It's available in the LightGBM API as LGBMClassifier. To use it, import the class and create an instance with the desired model parameters.
from lightgbm import LGBMClassifier

clf = LGBMClassifier(boosting_type='gbdt', num_leaves=31, learning_rate=0.05, n_estimators=100)
clf.fit(X_train, y_train)
LightGBM Regressor
For regression tasks, LightGBM provides the LGBMRegressor class. Similar to the LGBMClassifier, you can create an instance of the regressor with your desired model parameters.
from lightgbm import LGBMRegressor

reg = LGBMRegressor(boosting_type='gbdt', num_leaves=31, learning_rate=0.05, n_estimators=100)
reg.fit(X_train, y_train)
Cross-Validation
Cross validation is a technique used to assess the performance of machine learning models more reliably. LightGBM provides the cv function, which performs k-fold cross validation using the given dataset and model parameters.
from sklearn.model_selection import KFold

kf = KFold(n_splits=5, shuffle=True, random_state=42)
lgb_cv = lgb.cv(params, train_data, num_boost_round=100, folds=kf, early_stopping_rounds=10)
Handling Imbalanced Data
LightGBM has built-in support for handling imbalanced data by adjusting the class_weight parameter. You can set the class weights to 'balanced' to automatically adjust the weights based on the number of samples for each class.
clf = LGBMClassifier(boosting_type='gbdt', class_weight='balanced')
clf.fit(X_train, y_train)
Early Stopping
To avoid overfitting and reduce training time, you can use early stopping. Early stopping stops the training process if the performance on the validation set does not improve for a specified number of boosting rounds.
model = lgb.train(params, train_data, num_boost_round=1000, valid_sets=[train_data], early_stopping_rounds=10)
GPU Acceleration
LightGBM supports GPU acceleration, which can significantly speed up the training process. To enable GPU acceleration, you need to have the appropriate GPU version of LightGBM installed and set the device parameter to 'gpu' in your model parameters.
params = {
    'device': 'gpu',
    # Other parameters...
}
Feature Importance in LightGBM
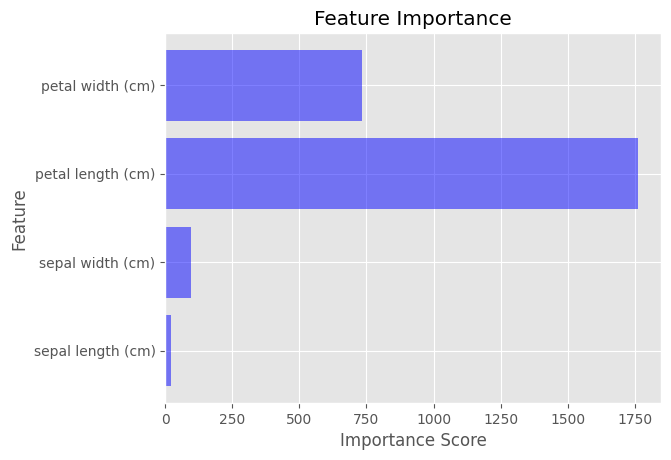
After training a LightGBM model, you can calculate feature importance using the feature_importance() method. This method returns an array of importance scores for each feature in the dataset.
importance_scores = model.feature_importance(importance_type='gain')
To visualize feature importance, we can use a bar chart that shows the importance scores for each feature. This can be easily done using Matplotlib.
import matplotlib.pyplot as plt

plt.style.use('ggplot')

feature_names = iris.feature_names
plt.barh(feature_names, importance_scores, color='blue', alpha=0.5)
plt.xlabel('Importance Score')
plt.ylabel('Feature')
plt.title('Feature Importance')
plt.show()

Distributed Learning
Distributed learning allows you to train a LightGBM model on multiple machines, which can be useful when dealing with extremely large datasets. LightGBM supports various distributed learning setups, such as MPI, socket, and Hadoop. To enable distributed learning, you need to set the machines parameter in your model parameters and use a specific distributed learning setup.
For more information on setting up distributed learning with LightGBM, refer to the official documentation: