


Introduction
Text classification is one of the common tasks in NLP and can be used for a wide range of applications. In this article, I will use DistilBERT to perform sentiment analysis, a form of text classification.
Hugging Face ecosystem
The Hugging Face ecosystem makes it easy to develop fine-tuned models for inference from raw text.
The Hugging Face ecosystem includes three core libraries:
- Datasets
- Tokenizers
- Transformers
With the Hugging Face ecosystem, development proceeds in the following flow:
- Get a dataset
Search the Hugging Face page for a dataset for the task you want to solve (if you don't find a dataset that looks good, create your own dataset) - Get a Tokenizer
Get a Tokenizer that matches your pre-trained model - Tokenization
Process the dataset with Tokenizer - Get a model
Get pre-trained model - Training
Run training - Inference
Inference by the model
In the following, we follow the above flow to develop a model in the Google Colab environment.
Install libraries
Install the following libraries.
!pip install transformers
!pip install datasets
Get a dataset
You must first find a dataset to use.
Hugging Face offers a wealth of datasets. Datasets can be found at the following link.
To download data from the Hugging Face Hub, use the datasets library. In this article, I will download a dataset called emotion.
from datasets import load_dataset

dataset = load_dataset("emotion")
Check the contents of the acquired data set.
>> dataset

DatasetDict({
    train: Dataset({
        features: ['text', 'label'],
        num_rows: 16000
    })
    validation: Dataset({
        features: ['text', 'label'],
        num_rows: 2000
    })
    test: Dataset({
        features: ['text', 'label'],
        num_rows: 2000
    })
})
The dataset is divided into train, validation, and test, each of which has information such as text and label.
The dataset can be treated as a DataFrame by setting the format to pandas.
dataset.set_format(type="pandas")
train_df = dataset["train"][:]
>> train_df.head(5)

|     | text                                              | label |
| --- | ------------------------------------------------- | ----- |
| 0   | i didnt feel humiliated                           | 0     |
| 1   | i can go from feeling so hopeless to so damned... | 0     |
| 2   | im grabbing a minute to post i feel greedy wrong  | 3     |
| 3   | i am ever feeling nostalgic about the fireplac... | 2     |
| 4   | i am feeling grouchy                              | 3     |
Check the breakdown of label.
>> train_df.value_counts(["label"])

label
1        5362
0        4666
3        2159
4        1937
2        1304
5         572
dtype: int64
We can see that there are six different labels. The meaning of each label can be checked using features.
>> dataset["train"].features

{'text': Value(dtype='string', id=None),
 'label': ClassLabel(names=['sadness', 'joy', 'love', 'anger', 'fear', 'surprise'], id=None)}
The label is a ClassLabel class and seems to be assigned as follows.
- 0: sadness
- 1: joy
- 2: love
- 3: anger
- 4: fear
- 5: surprise
The method int2str() of the ClassLabel class can be used to create a new column in the DataFrame corresponding to the label name.
def label_int2str(x):
	return dataset["train"].features["label"].int2str(x)

train_df["label_name"] = train_df["label"].apply(label_int2str)
>> train_df.head()

|     | text                                              | label | label_name |
| --- | ------------------------------------------------- | ----- | ---------- |
| 0   | i didnt feel humiliated                           | 0     | sadness    |
| 1   | i can go from feeling so hopeless to so damned... | 0     | sadness    |
| 2   | im grabbing a minute to post i feel greedy wrong  | 3     | anger      |
| 3   | i am ever feeling nostalgic about the fireplac... | 2     | love       |
| 4   | i am feeling grouchy                              | 3     | anger      |
Finally, restore the formatting that was done to the DataFrame.
dataset.reset_format()
Get a Tokenizer
Hugging Face provides a convenient AutoTokenizer class that allows you to quickly load a Tokenizer associated with a pre-trained model.
The Tokenizer can be loaded simply by calling the from_pretrained() method with the ID of the model on the Hub or a local file path. In this case, we will load distilbert-base-uncased, which is the Tokenizer for DistilBERT.
from transformers import AutoTokenizer

model_ckpt = "distilbert-base-uncased"
tokenizer = AutoTokenizer.from_pretrained(model_ckpt)
Prepare a sample text and run Tokenizer.
sample_text = "\
DistilBERT is a small, fast, cheap and light Transformer model based on the BERT architecture. \
Knowledge distillation is performed during the pre-training step to reduce the size of a BERT model by 40% \
"
The result of Tokenizer is as follows.
sample_text_encoded = tokenizer(sample_text)
print(sample_text_encoded)
{'input_ids': [101, 4487, ..., 1003, 102], 'attention_mask': [1, 1, ..., 1, 1]}
The text encoded by the Tokenizer contains input_ids and attention_mask.
input_ids is a numeric-encoded token.
attention_mask is a mask to determine if the token is valid for later models. Invalid tokens, such as [PAD], are processed with attention_mask set to 0.
The convert_ids_to_tokens() method can be used to obtain a token string.
tokens = tokenizer.convert_ids_to_tokens(sample_text_encoded.input_ids)
print(tokens)
['[CLS]', 'di', '##sti', '##lbert', 'is', 'a', 'small', ',', 'fast', ',', 'cheap', 'and', 'light', 'transform', '##er', 'model', 'based', 'on', 'the', 'bert', 'architecture', '.', 'knowledge', 'di', '##sti', '##llation', 'is', 'performed', 'during', 'the', 'pre', '-', 'training', 'step', 'to', 'reduce', 'the', 'size', 'of', 'a', 'bert', 'model', 'by', '40', '%', '[SEP]']
A prefix of ## indicates that the string has been split into subwords.
You can use convert_tokens_to_string() to reconstruct the string.
decode_text = tokenizer.convert_tokens_to_string(tokens)
print(decode_text)
[CLS] distilbert is a small, fast, cheap and light transformer model based on the bert architecture. knowledge distillation is performed during the pre - training step to reduce the size of a bert model by 40 % [SEP]
Tokenization
To apply the tokenization process to the entire data set, define a function to process it on a batch basis and use map to perform it.
def tokenize(batch):
    return tokenizer(
      batch["text"],
      padding=True,
      truncation=True
    )
If padding=True is specified, the batch will be filled with zeros up to the size of the longest one in the batch, and if truncation=True is specified, the batch will be truncated beyond the maximum context size supported by the model.
The maximum context size supported by the model can be found below.
>> tokenizer.model_max_length

512
Applies tokenization to the entire data set. batched=True to batch, batch_size=None to make the entire set one batch.
dataset_encoded = dataset.map(tokenize, batched=True, batch_size=None)
>> dataset_encoded

DatasetDict({
    train: Dataset({
        features: ['text', 'label', 'input_ids', 'attention_mask'],
        num_rows: 16000
    })
    validation: Dataset({
        features: ['text', 'label', 'input_ids', 'attention_mask'],
        num_rows: 2000
    })
    test: Dataset({
        features: ['text', 'label', 'input_ids', 'attention_mask'],
        num_rows: 2000
    })
})
You can see that columns have been added to the entire data set.
You can check the results on a sample-by-sample basis using DataFrame or similar.
import pandas as pd

sample_encoded = dataset_encoded["train"][0]
pd.DataFrame(
    [sample_encoded["input_ids"]
     , sample_encoded["attention_mask"]
     , tokenizer.convert_ids_to_tokens(sample_encoded["input_ids"])],
    ['input_ids', 'attention_mask', "tokens"]
).T

|     | input_ids | attention_mask | tokens |
| --- | --------- | -------------- | ------ |
| 0   | 101       | 1              | \[CLS] |
| 1   | 1045      | 1              | i      |
| 2   | 2134      | 1              | didn   |
| 3   | 2102      | 1              | ##t    |
| 4   | 2514      | 1              | feel   |
| ... | ...       | ...            | ...    |
| 82  | 0         | 0              | \[PAD] |
| 83  | 0         | 0              | \[PAD] |
| 84  | 0         | 0              | \[PAD] |
| 85  | 0         | 0              | \[PAD] |
| 86  | 0         | 0              | \[PAD] |
Get a model
Pre-trained models can be retrieved from the following
A dedicated class is already prepared for the task of classifying text in series units.
import torch
from transformers import AutoModelForSequenceClassification, EvalPrediction

device = torch.device("cuda" if torch.cuda.is_available() else "cpu")
num_labels = len(dataset_encoded["train"].features["label"].names)

model = AutoModelForSequenceClassification.from_pretrained(model_ckpt, num_labels=num_labels).to(device)
Training
First, define the metrics to be used during training as a function.
from sklearn.metrics import accuracy_score, f1_score

def compute_metrics(pred: EvalPrediction):
    labels = pred.label_ids
    preds = pred.predictions.argmax(-1)
    f1 = f1_score(labels, preds, average="weighted")
    acc = accuracy_score(labels, preds)
    return {"accuracy": acc, "f1": f1}
Then, training parameters are defined using the TrainingArguments class.
from transformers import TrainingArguments

batch_size = 16
logging_steps = len(dataset_encoded["train"]) // batch_size
model_name = "sample-distilbert-text-classification"

training_args = TrainingArguments(
    output_dir=model_name,
    num_train_epochs=2,
    learning_rate=2e-5,
    per_device_train_batch_size=batch_size,
    per_device_eval_batch_size=batch_size,
    weight_decay=0.01,
    evaluation_strategy="epoch",
    disable_tqdm=False,
    logging_steps=logging_steps,
    push_to_hub=False,
    log_level="error"
)
The Trainer class is used for training.
from transformers import Trainer

trainer = Trainer(
    model=model,
    args=training_args,
    compute_metrics=compute_metrics,
    train_dataset=dataset_encoded["train"],
    eval_dataset=dataset_encoded["validation"],
    tokenizer=tokenizer
)
trainer.train()


| Epoch | Training Loss | Validation Loss | Accuracy | F1       |
| ----- | ------------- | --------------- | -------- | -------- |
| 1     | 0.481200      | 0.199959        | 0.926000 | 0.924853 |
| 2     | 0.147700      | 0.155566        | 0.936500 | 0.936725 |

TrainOutput(global_step=2000, training_loss=0.3144808197021484, metrics={'train_runtime': 301.8879, 'train_samples_per_second': 106.0, 'train_steps_per_second': 6.625, 'total_flos': 720342861696000.0, 'train_loss': 0.3144808197021484, 'epoch': 2.0})
Inference
You can get the result of inference by predict().
preds_output = trainer.predict(dataset_encoded["validation"])
The inference results are visualized in a confusion matrix as follows.
import numpy as np
import matplotlib.pyplot as plt
from sklearn.metrics import ConfusionMatrixDisplay, confusion_matrix

plt.style.use('ggplot')

y_preds = np.argmax(preds_output.predictions, axis=1)
y_valid = np.array(dataset_encoded["validation"]["label"])
labels = dataset_encoded["train"].features["label"].names

def plot_confusion_matrix(y_preds, y_true, labels):
    cm = confusion_matrix(y_true, y_preds, normalize="true")
    fig, ax = plt.subplots(figsize=(8, 8))
    plt.rcParams.update({'font.size': 12})
    disp = ConfusionMatrixDisplay(confusion_matrix=cm, display_labels=labels)
    disp.plot(cmap="Blues", values_format=".2f", ax=ax, colorbar=True)
    plt.grid(None)
    plt.title("Normalized confusion matrix", fontsize=16)
    plt.show()

plot_confusion_matrix(y_preds, y_valid, labels)
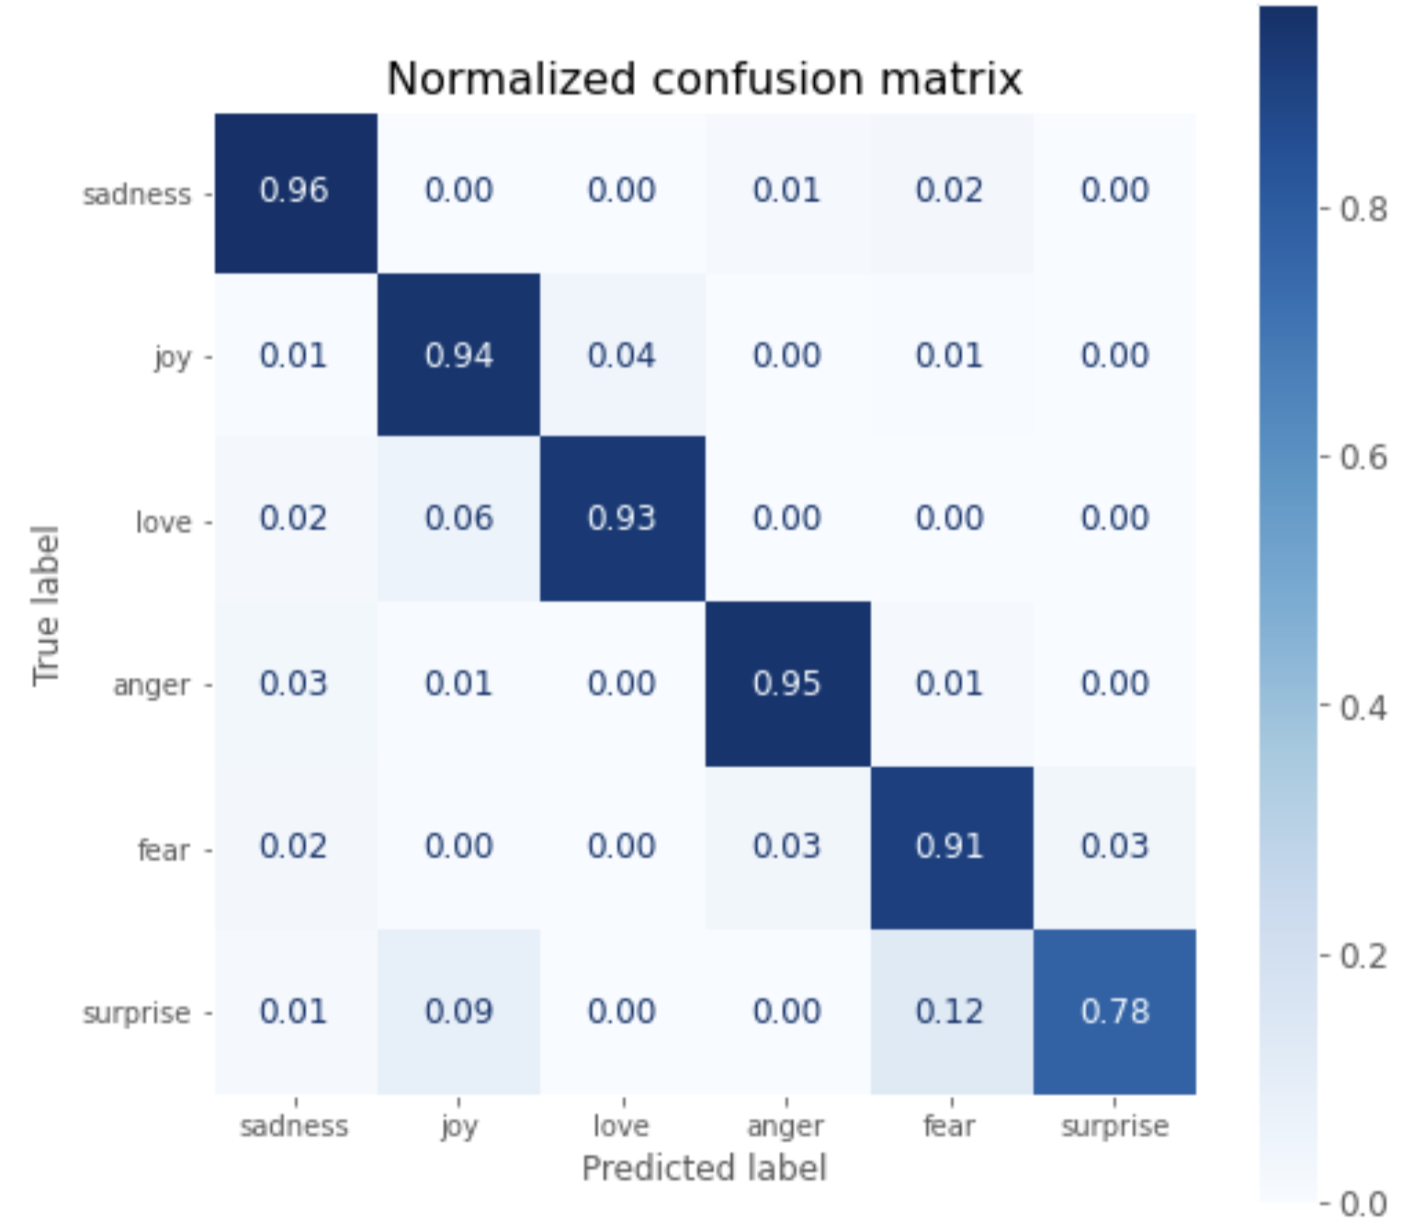
You can see that except for surprise, the correct answer rate is over 90%.
Save the model
Set the label information and save the model with save_model().
id2label = {}
for i in range(dataset["train"].features["label"].num_classes):
    id2label[i] = dataset["train"].features["label"].int2str(i)

label2id = {}
for i in range(dataset["train"].features["label"].num_classes):
    label2id[dataset["train"].features["label"].int2str(i)] = i

trainer.model.config.id2label = id2label
trainer.model.config.label2id = label2id

trainer.save_model(f"./{model_name}")
The result of saving is the following directory structure.
sample-distilbert-text-classification
├── config.json
├── pytorch_model.bin
├── special_tokens_map.json
├── tokenizer_config.json
├── training_args.bin
└── vocab.txt
Load and infer
Load the saved Tokenizer and model as a PyTorch model.
saved_tokenizer = AutoTokenizer.from_pretrained(f"./{model_name}")
saved_model = AutoModelForSequenceClassification.from_pretrained(f"./{model_name}").to(device)
Let us try to infer the sample text.
inputs = saved_tokenizer(sample_text, return_tensors="pt")

new_model.eval()

with torch.no_grad():
    outputs = saved_model(
        inputs["input_ids"].to(device),
        inputs["attention_mask"].to(device),
    )

outputs.logits
tensor([[-0.5823,  2.9460, -1.4961,  0.1718, -0.0931, -1.4067]],
       device='cuda:0')
Converting logits to inferred labels shows that the emotion of the sample text is inferred as joy.
y_preds = np.argmax(outputs.logits.to('cpu').detach().numpy().copy(), axis=1)

def id2label(x):
    return new_model.config.id2label[x]

y_dash = [id2label(x) for x in y_preds]
>> y_dash

['joy']
Google Colaboratory code
The following is a summary of the code.
from datasets import load_dataset
from transformers import AutoModelForSequenceClassification, AutoTokenizer
from transformers import TrainingArguments
from transformers import Trainer
from sklearn.metrics import accuracy_score, f1_score
from sklearn.metrics import ConfusionMatrixDisplay, confusion_matrix
import torch
import matplotlib.pyplot as plt
import numpy as np

plt.style.use('ggplot')

# checkpoint
model_ckpt = "distilbert-base-uncased"

# get dataset
dataset = load_dataset("emotion")

# get tokenizer
tokenizer = AutoTokenizer.from_pretrained(model_ckpt)

# get model
device = torch.device("cuda" if torch.cuda.is_available() else "cpu")
num_labels = dataset["train"].features["label"].num_classes
model = (AutoModelForSequenceClassification
    .from_pretrained(model_ckpt, num_labels=num_labels)
    .to(device))

# tokenize
def tokenize(batch):
    return tokenizer(batch["text"], padding=True, truncation=True)
dataset_encoded = dataset.map(tokenize, batched=True, batch_size=None)

# preparation for training
batch_size = 16
logging_steps = len(dataset_encoded["train"]) // batch_size
model_name = f"sample-text-classification-distilbert"
training_args = TrainingArguments(
    output_dir=model_name,
    num_train_epochs=2,
    learning_rate=2e-5,
    per_device_train_batch_size=batch_size,
    per_device_eval_batch_size=batch_size,
    weight_decay=0.01,
    evaluation_strategy="epoch",
    disable_tqdm=False,
    logging_steps=logging_steps,
    push_to_hub=False,
    log_level="error",
)

# define evaluation metrics
def compute_metrics(pred):
    labels = pred.label_ids
    preds = pred.predictions.argmax(-1)
    f1 = f1_score(labels, preds, average="weighted")
    acc = accuracy_score(labels, preds)
    return {"accuracy": acc, "f1": f1}

# train
trainer = Trainer(
    model=model, args=training_args,
    compute_metrics=compute_metrics,
    train_dataset=dataset_encoded["train"],
    eval_dataset=dataset_encoded["validation"],
    tokenizer=tokenizer
)
trainer.train()

# eval
preds_output = trainer.predict(dataset_encoded["validation"])

y_preds = np.argmax(preds_output.predictions, axis=1)
y_valid = np.array(dataset_encoded["validation"]["label"])
labels = dataset_encoded["train"].features["label"].names

def plot_confusion_matrix(y_preds, y_true, labels):
    cm = confusion_matrix(y_true, y_preds, normalize="true")
    fig, ax = plt.subplots(figsize=(8, 8))
    plt.rcParams.update({'font.size': 12})
    disp = ConfusionMatrixDisplay(confusion_matrix=cm, display_labels=labels)
    disp.plot(cmap="Blues", values_format=".2f", ax=ax, colorbar=True)
    plt.grid(None)
    plt.title("Normalized confusion matrix", fontsize=16)
    plt.show()
plot_confusion_matrix(y_preds, y_valid, labels)

# labeling
id2label = {}
for i in range(dataset["train"].features["label"].num_classes):
    id2label[i] = dataset["train"].features["label"].int2str(i)

label2id = {}
for i in range(dataset["train"].features["label"].num_classes):
    label2id[dataset["train"].features["label"].int2str(i)] = i

trainer.model.config.id2label = id2label
trainer.model.config.label2id = label2id


# save
trainer.save_model(f"./{model_name}")

# load
new_tokenizer = AutoTokenizer\
    .from_pretrained(f"./{model_name}")

new_model = (AutoModelForSequenceClassification
    .from_pretrained(f"./{model_name}")
    .to(device))

# infer with sample text
inputs = new_tokenizer(sample_text, return_tensors="pt")
new_model.eval()
with torch.no_grad():
    outputs = new_model(
        inputs["input_ids"].to(device),
        inputs["attention_mask"].to(device),
    )
y_preds = np.argmax(outputs.logits.to('cpu').detach().numpy().copy(), axis=1)
def id2label(x):
    return new_model.config.id2label[x]
y_dash = [id2label(x) for x in y_preds]
y_dash
References


Ryusei Kakujo


Weave the future of cities through data
Transportation modeling/ Urban planning/ Machine learning/ Computer science/ GIS